Do You Want to Learn How to Setup WordPress With BlueHost?
Then you’ve come to the right place.
I think you’ll agree when we say:
A lot goes into starting a blog and at times it can be confusing.
That may be true if you going into it completely alone. However, you need to always remember you are not alone. We are here to help!
We will show you every step you need to take to setup your WordPress website with BlueHost hosting in just a few clicks.
Screenshots are provided to make it even easier!
So let’s start with…
Why BlueHost?
BlueHost is a great platform to choose for your hosting. Whether you already own a domain or you want to buy one, the registration process is quick and simple.
BlueHost Hosting services contain:
- Cheap web hosting
- Great protection (FREE SSL)
- Dashboard full with WordPress applications
- Official recommended host by WordPress
- FREE domain
- 24/7 Support
- 30 days refund policy
As you can see above, BlueHost offers a good chunk of advantages for every blogger starting out and for seasoned bloggers.
Now you’re just a few clicks shy of launching your very own WordPress website!
Let’s continue.
We’re going to walk you through the whole process:
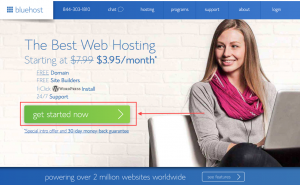
Step 1: Open BlueHost Homepage
Before You Begin: We suggest opening the BlueHost homepage through our link! BlueHost offers our readers exclusive insider deals starting as low as $2.95 a month. Also when you use this link to purchase Bluehost, we receive a commission at no extra cost to you plus you will get our special deal and a free domain for an year. We only recommend products, tools, services and learning resources we believe are genuinely helpful.
Alright, let’s get started!
Click on the link above and hover over the green box “get started now”.
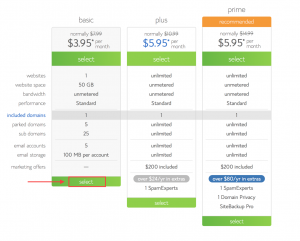
Step 2: Select a BlueHost Hosting Plan
The next step is to select a BlueHost hosting plan that suits your personal needs best.
You basically have two options here.
Ask yourself:
“Am I going to launch one or multiple WordPress websites?”
We recommend selecting the basic option, it’s the best option when you’re just starting out.
However, if you, for example, plan to launch a number affiliate websites and aim to launch multiple websites, you might have to consider selecting the plus option.
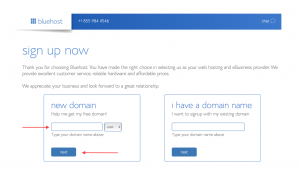
Step 3: Choose a Domain Name
Registering a new domain is free with BlueHost!
Did you already buy a domain name elsewhere? No problem, just fill out the box on the right hand side.
In most cases, we recommend choosing a “.com” domain due to the fact it’s most familiar and accessible.
Want to start a local blog? You might want to consider choosing a known ccTLD such as .com.au, .ca or .co.uk.
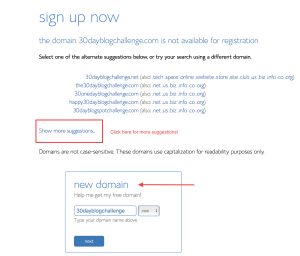
Is the domain you want to secure is not available?
BlueHost will automatically show alternate suggestions. You can also click on “Show more suggestions” in order to provide a complete list of alternatives.
Choose a new domain name and click “Next”!
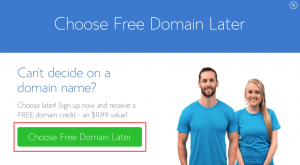
But wait, there is more…..
Selecting the perfect domain name can be hard. That’s why BlueHost allows you to skip this step and choose a domain name later.
You will receive a $11.99 domain name credit!
Simply move your mouse towards the top left hand corner and wait for the popup to appear. Then hit the green box “Choose Free Domain Later”.
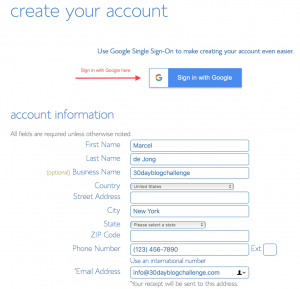
Step 4: Create an Account
Fill out the form with your personal details in order to create an account.
You can also create an account by clicking “Sign in with Google”.
This will make it even easier and faster.
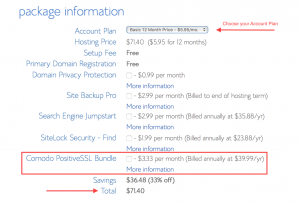
Step 5: Package Information & Add-ons
Now you’ve selected a hosting plan, probably selected a domain name, and registered an account – it's time for the final phase to complete the host selection process!
Selecting package information is the final step before filling in your payment details. The first option is “Account Plan”.
We recommend: Selecting the “Basic 24 Month Price, $4.95/mo”( $3.95 if you sign up through our link) or higher.
Let us explain.
Only the first option, as shown in the screenshot, will charge you $3.33/mo or $39.99/yr for the “Comodo Positive SSL Bundle”. It’s included free of charge for all the other packages.
Here’s the deal:
With SSL protection you’ll get a secure connection sign with a lock:
It means that the data and information that’s passed on from PC to PC is secured. Personal details and other sensitive information are encrypted.
And more importantly: Google likes this!
Do I have to select every add-on?
NO.
Domain Privacy Protection is recommended.
It’s pretty cheap and it will hide your personal and contact details. Especially when you’re starting a WordPress blog, people and scrapers won’t be able to retrieve your details through tools like “WhoIs”. It helps to limit spam and junk mail too.
Site Backup Pro is an add-on you can consider selecting too.
A backup option is always recommended. However, there are other good options that automatically backup your website or blog. BlueHost charges $12.99 per month, but many other backup tools and plugins are free.
If you’re just starting out, you can reevaluate your situation again later and save some extra bucks for now.
Now you’ve setup your BlueHost hosting. And yes…
It really is that simple!
Just One More Hurdle To Overcome
The final phase is to setup WordPress on your BlueHost domain in order to start building your new website.
Here’s How:
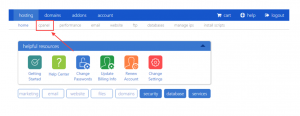
Step 1: Login to BlueHost cPanel
Start by clicking the link above.
Log in with your BlueHost account details.
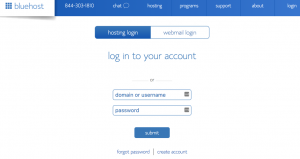
Then hover over to “hosting” and click on “cpanel”.
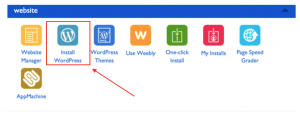
Step 2: Find “Website” Tab
Scroll down and locate the “website” tab and click on “Install WordPress”.
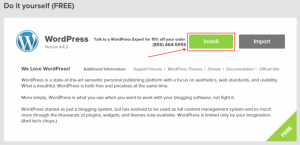
Step 3: Install WordPress
Click on the green button “Install”.
Step 4: Select Domain
It’s time to install WordPress on your domain.
Fill in the blanks and click “Next”
Step 5: The Finishing Touch
We’re almost there. Just one more step!
Select “Show advanced options” and fill in the blanks.
Don’t choose “admin” as your “Admin Username” but rather come up with a unique username.
Make sure to select a strong Admin Password!
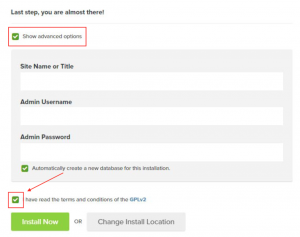
Click the “Install Now” button to start the installation process.
Shouldn’t take more than 60 seconds.

And….BOOM!
You’ve done it.
A confirmation email will be sent to the email you registered your BlueHost account with.
Now it’s time to select the perfect WordPress theme for your new website and let your creative mind baffle the competition!
5..4..3..2..1.. Liftoff!
With just two very simple 5-step guides you are ready to launch your very own WordPress website with BlueHost hosting as your platform.
Remember..
..if this is your first website, don’t go crazy with add-ons and expensive packages. Select the cheapest option available – basically deselect most extra options – in order to keep your spending low and test the waters first.
When you get the hang of it and feel ready to launch a new project, this might be a good opportunity to consider some of the add-ons or an upgrade in hosting package.
What’s stopping you?
Nothing! This guide is all you need!
Walk through this simple guide and launch your very own project today!
If you have any questions….just shoot!