Looking For a Guide to Setup WordPress With HostGator?
Then you've come to the right place!
We’ve created a super simple “One-Click” setup guide for you!
Do you want to know more?
When you’re just starting out, HostGator is a great platform to host your new WordPress website with.
When you are new to WordPress and hosting, it can be a hassle to quickly setup your website’s fundamentals. That’s why we are here for you.
In this guide, we will walk you through every step you need to take in order to successfully complete the following:
- Setup a HostGator Hosting Account
- Setup a WordPress with HostGator
- Launch Your Own Website!
Check out the screenshots at every step!
Let’s get started with…
Reasons why you should choose HostGator Hosting:
- Easy & Cheap Web Hosting
- 24/7/365 Support
- 45 days refund policy
- 99.9% Uptime
- 1-Click Installation
- 100$ Credit Deals – Yahoo/Bing & Google AdWords
- Widely recognized as one of the best web hosting companies
This list contributes to the fact that HostGator is among the most popular web hosting services out there.
Our “One-Click” setup guide in combination with the extremely user-friendly interface of HostGator is your road to success!
Want to see how it works?
Let’s start with setting up a HostGator hosting account. Simply follow the next steps:
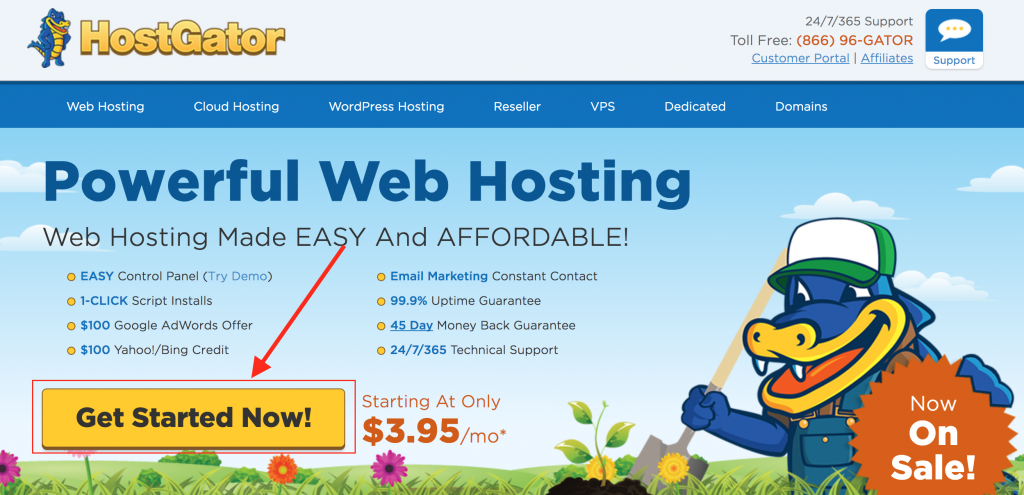
Step 1: Go to HostGator
Hit the link above and you’ll be forwarded to HostGator’s homepage. Also when you use this link to purchase Hostgator, we receive a commission at no extra cost to you plus you will get our special deal and a free domain for an year. We only recommend products, tools, services and learning resources we believe are genuinely helpful.
Click on “Get Started Now!”.
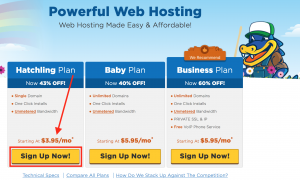
Step 2: Select HostGator Hosting Plan
The next thing you’ll have to do is to sign up for a hosting plan.
There is only one difference between “Hatchling” and “Baby” plan:
“Baby” plan means you’ll be able to host unlimited domains, while “Hatchling” is a hosting package for a single domain.
Bottom line:
We recommend to select the Hatchling package unless you’re planning to launch multiple different websites in the near future.
It’s tempting to go for the Baby plan, however, you probably don’t need it right now and it’s the perfect opportunity to save some cash.
When you’ve made your decision, proceed to the next step by clicking “Sign Up Now!”.
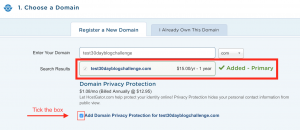
Step 3: Register a Domain Name
It’s time to choose a domain name.
In case you already secured a domain name elsewhere, fill out the box on the right hand side. Use the box on the left hand side if you want to secure a new domain.
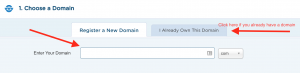
Let’s assume you haven’t secured a domain name yet.
Fill out the blanks “Enter Your Domain” with your chosen domain name.
When you’ve entered an unavailable domain name, HostGator will automatically show a list of alternative names. As you can see in the screenshot, HostGator adjusted the domain extension.
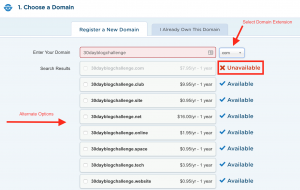
For the sake of this example, let’s enter an available domain name now.
Domain prices are typically variable and stated on the right side in the box – refer to screenshot.
Domain Privacy Protection is recommended.
It’s a good add-on to limit spam and junk mail, and relatively cheap. On top of that, contact details and other personal information will be blocked from scrapers and bots, and it will be hidden from tools such as WhoIs.com.
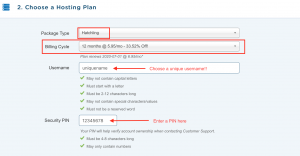
Step 4: Select a HostGator Hosting Plan
Start by selecting “Package Type”. As mentioned before, we recommend the Hatchling package. You can choose between a 12/24/36 months plan.
We recommend selecting a 12 or 24 months plan and reevaluate later on.
What else?
Choose a unique username and security PIN.
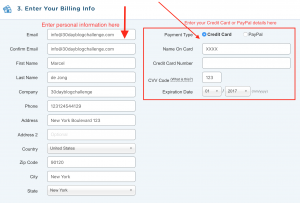
Step 5: Personal Information
The next step requires your personal details and payment type + details.
Fill out your personal details on the left side and insert your Credit Card or PayPal details on the right side.
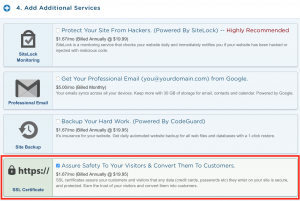
Step 6: Add-ons
Now you’ve selected a web hosting plan, domain name, and a specific package.
Selecting add-ons is next.
Tip: Don’t go crazy with add-ons!
We recommend to only tick the “SSL Certificate” box.
Why?
All in -and outgoing data on your website will be secured and you’ll receive a security logo.
The best thing about this: Google likes it!
The remaining add-ons are “extra’s” for your website, however, when you’re just launching your first WordPress blog, you can save some bucks by deselecting these add-ons.
Step 7: Lower The Total Price!
If you happen to have a coupon code, you can enter it here. You can often find codes for deals on hosting by just googling it.
It’s the perfect opportunity to save some extra cash!

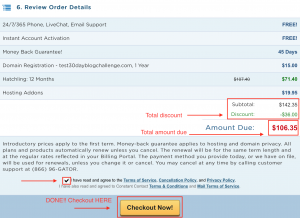
Step 8: Check, Check, Double Check
You’ve completed all the required steps and successfully registered an account for a web hosting plan at HostGator.
Don’t forget to check your order details for:
- Do you have the correct Domain Registration?
- Have you chosen the right Hosting Plan?
- Are your Hosting Addons correct?
- Did you use your Coupon Code?
- Is the amount Due is Correct?
And BAM!! That’s it!!
Tick the “Terms of Service and Policies” box and hit the yellow “Checkout Now!” button!
You've now completed the hardest part of setting up WordPress with HostGator. It's now time to move on to the second section. Don't worry this will be fairly quick and painless.
Only a Few Simple Things Left To Do
Upon completion of setting up your HostGator hosting, you’ll receive a confirmation email named: “Your Account Details”.
The final step is to setup WordPress within HostGator customer’s portal.
It sounds simple. And it is.
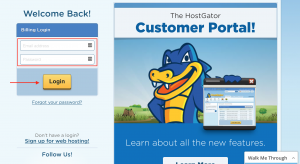
Step 1: Login to “Your Control Panel”
Find “Your Control Panel” in the confirmation email you received from HostGator and click on the link.
Enter your email address & password. Now click on the “Login” box.
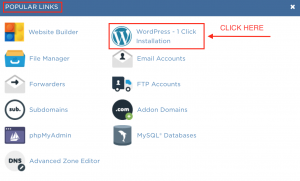
Step 2: One-Click WordPress Installation
Once you’re logged into cPanel, find the section “Popular Links”.
Hover over to “WordPress – 1 Click Installation” and click the button.
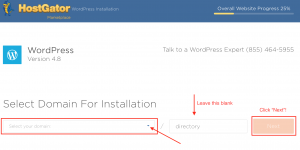
Step 3: Select Domain
Select your earlier chosen domain for installation.
Leave “directory” field empty.
Click….. NEXT!
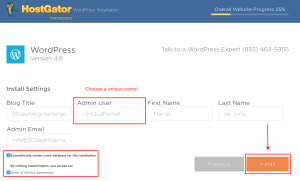
Step 4: Install Settings
Fill in the blanks.
Important: Choose a unique Admin Username!
Tick both lower boxes and click on the orange “Install” button.
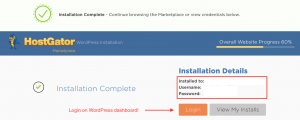
Step 5: Congratulations!
The installation process will only take a few seconds. And then….
….KABOOOOOM!
You’ve done it. Well done!
Dream Big. Start small. Act now.
In a nutshell:
The setup of your HostGator hosting account and WordPress installation is super simple! Especially with this guide you are just a few clicks away from creating your own WordPress website! Hosted by one of the best web hosting companies out there!
Let’s not forget…
..if you’re new to the scene and launching your first WordPress website or blog, try to keep your spending low and select the Hatchling plan with no extra features.
Once you’ve gained more experience and you’re ready to launch a new project, consider selecting a few add-ons that are worth the money or upgrade your hosting plan.
Now make it happen!
Once you’ve completed this simple guide it’s time to create your very own WordPress blog or website! Check out the WordPress themes available in once you’ve logged in to your dashboard.
If you have any queries about our guide, don't be afraid to contact us!
We’d love to help you out and take your website to the next level!